Any use of the Tutorials is subject to prior knowledge and acceptance of these Terms of Use.
1.Legal Notice
1.1 Site Editor
ICM, Institut du Cerveau et de la Moelle épinière, a Foundation recognized as a public utility by a decree registered on 13 September 2006 by the Ministry of the Interior under number INT A 0600175 D, whose head office is located at GH Pitié Salpêtrière, 47/83 boulevard de l’Hôpital – 75013 Paris.
Phone: +33 (0)1 57 27 40 00
Mail: contact@icm-institute.org
Director of Publication :
Jean-Louis DA COSTA, Director of Communication and Development of the ICM.
Editorial managers: Axelle de CHAILLE, Thomas MARIANI
1.2 Hosting of the Site
The company CLARANET, registered in the Paris Trade and Companies Register under SIREN n°419 632 286 18-20, whose registered office is located at 18-20 rue du Faubourg du Temple – 75011 Paris.
2.Purpose and Definitions
The present General Conditions of Use are intended to govern the use of the Tutorials made available on the MHI Site.
Their purpose is to define the rules for the use of the Tutorials as well as the respective rights and obligations of Users of the Site and of the MHI.
The terms hereinafter defined shall have the meaning and scope given in their definition in the context of the conclusion and execution of these Terms and Conditions of Use.
“GCU” refers to the present General Terms and Conditions of Use of the Tutorials distributed via the Site, intended to provide a contractual framework for the use of the Tutorials by any User;
“Contents” refers to all the texts, photographs, illustrations, videos, functionalities and more generally any element existing within the Site and made available to Users;
“Device” refers to a set of parts constituting a mechanism, an apparatus, or a machine at the end of an experimental manufacturing process proposed by one of the Tutorials on the Site;
“Publisher” or “ICM” refers to the Brain and Spinal Cord Institute which publishes the Site within the meaning of Law No. 2004-575 of 21 June 2004 for confidence in the digital economy (known as the “LCEN Law”);
“Services” refers to the services offered to Users, for each of the Tutorials distributed on the Site, including in particular :
– A presentation space;
– A video space;
– A free download area;
– A space for step-by-step manufacturing;
– A space of instructions for use;
– A space useful contacts;
“Site” refers to the ICM website dedicated to the Tutorials, made available to Users at the address https://icm-institute.org/en/tutorial-for-making-ccfs-board/, and giving access to the Tutorials;
“Tutorial” refers to an independent educational guide, distributed on the Site, presenting a Device and presenting a vocation of information and initiation on how to make and use it.
“Tutorials” refers to all the Tutorials distributed via the Site.
“User” refers to any natural person from the general public or member of the scientific community, indifferently designated, accessing the Site and its Services and Content, and in case of specificity:
“Scientific Community” refers to any researcher and/or person whose work is related to science and scientific research, according to scientific methods, accessing the Site;
“User” refers to any natural person of full age and capacity accessing the Site.
3.Contractual documents
These GCU form the entire contractual relationship between the User and ICM for the provision of Services and Content within the framework of the Site.
If a provision of these GCU is found to be invalid by a competent court, the invalidity of this provision shall not affect the validity of the other provisions hereof.
No waiver of any provision of these GCU shall be deemed a definitive waiver of that provision or of any other provision of these GCU.
4. Entry into force and duration
These GCU come into force without reservation with respect to the User on the day of his acceptance of these GCU.
In general, the User acknowledges that access to and use of the Site signifies acceptance of the terms without reservation of the present GCU and marks the agreement of the conditions set forth even in the absence of signature of a document.
The applicable GCU are those in force at the date of consultation of the Site by the User.
5.Conditions of access and use
Access to the Site, its Services and Content by any User is subject to these GCU and more generally to compliance with all applicable laws.
Users may not use the Services and Content provided as part of the Site for any purpose other than that defined in these GCU, and in particular shall refrain from using the Site, including the Services and Content, for any advertising, promotional, industrial, commercial or professional purpose.
The Services and Contents of the Site are for the strictly personal use of Users and may not be used for the benefit of a company or any other organization. Commercial companies, and in general any regulated body or entity or profession may not as such become Users.
Any other use in fraud of the rights of the MHI exposes the User to prosecution.
The User acknowledges and accepts that all costs related to connection to the Internet network shall be borne exclusively by the User.
The Tutorials are offered in different web languages (HTML, HTML5, Javascript, CSS, etc…). For a better comfort of use and a more pleasant graphic design, it is recommended to use modern browsers such as Internet Explorer, Safari, Firefox, Google Chrome, etc…
5.1.Terms and conditions of use
Access to and consultation of the Site, Content and Services are offered to any User, freely and without charge (except for the costs incurred by the User to connect to the Internet).
6.Presentation of the Site
The Site constitutes a collaborative space whose objective is to enable ICM researchers to share Tutorials with Users and the Scientific Community in order to be informed and, if necessary, if they so wish and under their exclusive responsibility to manufacture various Devices themselves.
In this respect, each Tutorial provides Users with information, technical explanations and specific plans for building an Experimental Device.
WARNING
THE DEVICES PRESENTED IN THE TUTORIALS DO NOT IN ANY CASE CONSTITUTE MEDICAL DEVICES WITHIN THE MEANING OF ARTICLE L. 5211-1 OF THE PUBLIC HEALTH CODE.
AS SUCH, EXPERTS OR ENGINEERS HAVE NOT VALIDATED THE TUTORIALS, NOR HAVE THEY BEEN AUTHORISED, VALIDATED OR CERTIFIED IN ANY WAY BY ANY AUTHORITY.
THE SITE PURSUES AN OBJECTIVE OF SHARING INFORMATION, TECHNICAL EXPLANATIONS AND PLANS ALLOWING INFORMATION ON THE MANUFACTURE OF DEVICES INTENDED FOR THE STRICTLY PERSONAL AND EXPERIMENTAL USE OF THE USERS.
NONE OF THE DEVICES RESULTING FROM THE TUTORIALS IS INTENDED TO BE COMMERCIALIZED AND/OR INDUSTRIALIZED. ON THE CONTRARY, ANY COMMERCIALIZATION AND/OR INDUSTRIALIZATION OF ANY OF THE DEVICES RESULTING FROM THE TUTORIALS IS STRICTLY FORBIDDEN.
THE SERVICES AND CONTENTS OF THE SITE ARE PART OF AN INFORMATION REQUEST OF THE USERS. THE SITE IS NOT INTENDED TO PROVIDE, IN ANY WAY WHATSOEVER, ADVICE ON THE INDUSTRIALIZATION OR COMMERCIALIZATION OF DEVICES.
THE SITE, CONTENTS AND SERVICES DO NOT ALLOW THE DELIVERY OF PERSONALISED OR INDIVIDUALISED ADVICE.
IN CASE OF NEED, THE USER SHOULD CONTACT A COMPETENT PROFESSIONAL, THE COMPETENT AUTHORITIES IN ORDER TO CLARIFY ANY MANUFACTURING DECISION.
6.1.The Services and Contents of the Site
In order to allow the communication of information and explanations to the Users, the Site makes available to the Users different Services specific to each of the Tutorials.
Thus each Tutorial of the Site offers the following Services:
A space of presentation:
The presentation space allows the User to get acquainted with the origin, the context and the objectives of the selected Tutorial, by delivering information specific to this Tutorial.
A video space:
The video space is a video sequence of a few minutes offering practical advice specific to each Tutorial. The purpose of this video is to facilitate the making and/or use of the Device resulting from this Tutorial.
A free download area:
The download area allows each User to download for free some elements of the selected Tutorial, in order to facilitate the manufacturing of the Device attached to it.
For example, the User has the possibility to :
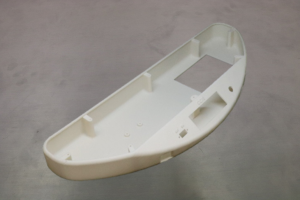
o Download an STL file to “print to a 3D printer” (Zortrax M300 like) ;
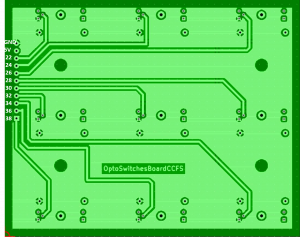
o Download a DXF file for “cutting on a laser cutting machine”;
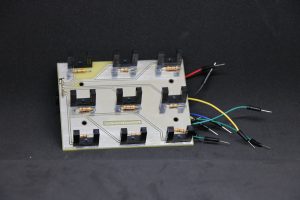
o Download the Arduino IDE and the file ” transfer to Arduino MEGA board “.
One manufacturing space per step :
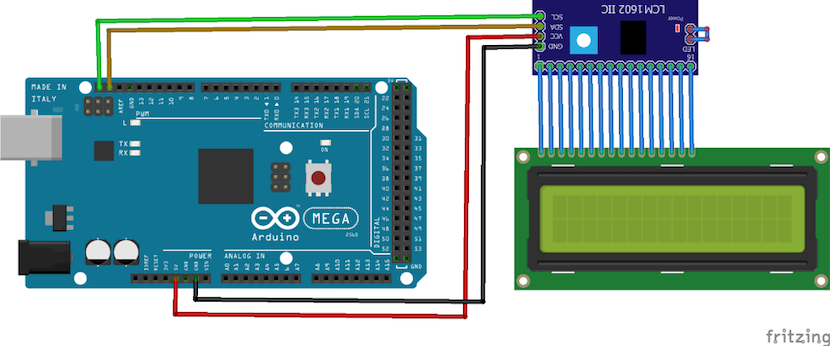
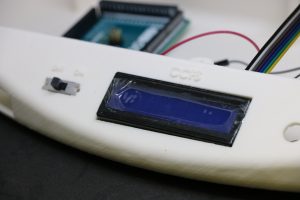
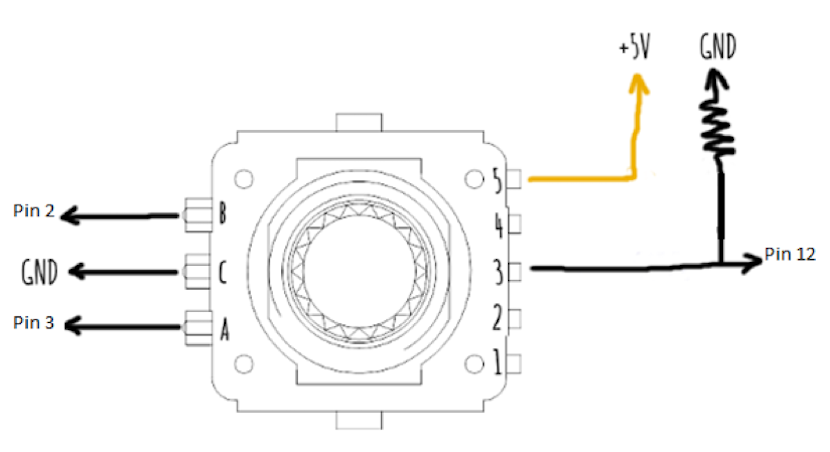
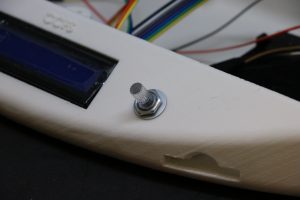
The step-by-step manufacturing space is an accompanying guide intended to help the User to build his own Experimental Device if he wishes and under his exclusive responsibility. It is presented in the form of text illustrated by images, allowing Users to benefit from detailed step-by-step instructions for the manufacture of the Device.
A space for instructions for use :
This space provides the User with instructions for use relating to the Device, intended to explain and facilitate the personal use of the Device by the User.
A contact area
The User is informed of the identity and contact details of the MHI personnel in charge of the selected Tutorial.
The User may use these contacts to address any queries relating to access and/or use of the Tutorial in question and thus benefit from a support service.
The provision of these contacts also allows the User to benefit from a service for sending information to the relevant staff.
The present article is intended to issue warnings concerning certain Services and Contents of the Site.
SPECIFIC WARNINGS
FOR EACH OF THE TUTORIALS, THE SERVICES AND IN PARTICULAR THE PEDAGOGICAL TOOLS OFFERED TO USERS PROVIDE GENERAL INFORMATION AIMED AT FACILITATING THE MANUFACTURE AND USE OF A DEVICE. THEY ARE PROVIDED FOR INFORMATION PURPOSES ONLY AND ARE NOT INDIVIDUALIZED, MARKETABLE OR INDUSTRIALIZABLE.
IN GENERAL, THE INFORMATION PROVIDED TENDS TO BE SCIENTIFICALLY ACCURATE AT THE TIME OF PUBLICATION, RELIABLE AND RELEVANT.
MOREOVER, THE INFORMATION MADE AVAILABLE WITHIN THE FRAMEWORK OF EACH OF THE TUTORIALS HAS A SYNTHETIC VOCATION AND IS BY NO MEANS EXHAUSTIVE.
IN SPITE OF THE CARE TAKEN IN PROCESSING THE INFORMATION, THE ICM DECLINES ALL RESPONSIBILITY FOR ANY ERRORS OR OMISSIONS RELATING TO THE INFORMATION DISSEMINATED WITHIN THE SITE.
L’ICM CANNOT BE HELD RESPONSIBLE FOR THE INTERPRETATION OR THE USE OF THE TUTORIALS, BUT ALSO FOR THE SERVICES, CONTENTS AND INFORMATION DIFFUSED WITHIN THE FRAMEWORK OF THE SITE, NOR FOR THE CONSEQUENCES.
THE USER ACKNOWLEDGES THAT THE USE HE MAKES OF THE INFORMATION AND FUNCTIONALITIES OF THE SITE AND THE DEVICES THAT RESULT FROM IT, IS MADE UNDER HIS SOLE CONTROL, DIRECTION AND RESPONSIBILITY.
7.Obligations and liability
The ICM is bound by a simple obligation of means within the framework of making the Tutorials available and, more generally, within the framework of providing the Services and Content of the Site.
The ICM undertakes to make every effort to provide Users with accurate and up-to-date information. It reserves the right to correct this information at any time and without notice.
The User acknowledges, however, that the ICM cannot guarantee the accuracy, precision, updating or exhaustiveness of the information made available on the Site.
Within the scope of this simple obligation of means, the User acknowledges that the ICM shall not be held liable for any material or immaterial damage, direct or indirect, whatever the cause (including damage that may be caused by the possible spread of viruses, by computer fraud, due to the constraints and limits of the Internet network or the loss, deterioration or alteration of files) nor for the consequences resulting therefrom:
– its use of the tutorials, the Site, its Services and functionalities and/or the interpretation of its Contents;
– of the impossibility of having access to the Tutorials, the Site, the Services and Contents, except for direct damages resulting from a gross or intentional fault.
In any event, the User acknowledges and accepts that the ICM is in no way responsible for the harmful consequences resulting from the manufacture and/or use of the Device(s) he/she has manufactured and/or their defectiveness.
The User remains exclusively and personally responsible for the use that he/she makes of the Tutorials, the Site and the Device(s) that he/she will have manufactured, under the conditions of common law. The User acknowledges that he/she alone makes any decision based on the Tutorials, the Services and the Content of the Site, where applicable.
In general, Users agree to use the Tutorials, Services and Content of the Site:
– in compliance with the laws, regulations and rights of third parties, including intellectual and industrial property rights;
– in a fair manner and in accordance with its purpose.
It is their responsibility, in particular:
– to meet their obligations in terms of security, in accordance with the article “Security” of these TOS;
– to use the Tutorials, the Site, its Services and Content in compliance with the GCU and the legal and regulatory provisions in force;
– not to commercialize or industrialize all or part of the Tutorials, of the Devices manufactured in the case which results from it, of the Services or Contents accessible via the Site.
In the event of non-compliance with one or more provisions of these GCU, access to the Site may be unilaterally, automatically and without notice, temporarily suspended or permanently blocked.
8.Cases of force majeure
The ICM shall not be held liable in the event of inaccessibility of the Site, its Services and Content, caused by events beyond its control that could not be reasonably foreseen and whose effects cannot be avoided by appropriate measures, and preventing the performance of its obligations within the meaning of the legal definition set out in Article 1278 of the Civil Code (“Force Majeure”).
The execution of these GCU shall be suspended for as long as the Force Majeure Event lasts, and the ICM shall endeavor to the extent possible to put an end to the Force Majeure Event or to find a solution enabling it to perform its contractual obligations despite the Force Majeure Event.
9.Security
It is the User’s responsibility to take all appropriate measures to protect his or her own data and materials from contamination by viruses or other forms of attack that may circulate via the Site.
Users acknowledge the existence of risks inherent to the use of telecommunications and particularly in terms of :
– lack of reliability of the Internet network;
– non guaranteed continuity in the access to the Site and to its Contents and Services;
– performance not guaranteed, particularly in view of the spread of viruses;
– any other technical constraints that are not under the control and responsibility of the ICM.
Under no circumstances shall the MHI be held liable for these risks and their prejudicial consequences, whatever the extent thereof, for the User.
10. Intellectual Property
The ICM is the exclusive owner of the intellectual and industrial property rights to the Tutorials, Services and Contents of the Site.
Access to and use of the Site in no way confers on Users a right of ownership over the Tutorials, Services and Contents of the Site.
The User acknowledges that all of the Site’s Content, including but not limited to the Tutorials, the domain name, texts, graphics, photographs, drawings, sounds, data, images, audio and video, as well as the Site’s tree structure, navigation plan, logos, the design and organization of its sections, their titles, databases, structure and content, existing or future, belong exclusively to the ICM, with the authorization of the holders of these rights where applicable.
These Tutorials, Contents and Services are exclusively intended for the personal use of the User who benefits from a private, non-collective and non-exclusive right of use. Any use, reproduction, copy, distribution of one or more elements of the Contents, Services, the Site and the Tutorials for other than private use is prohibited.
Users may reproduce selected excerpts from the Content, Services, the Site and Tutorials for strictly personal use, provided that they maintain and not modify the notices and mentions relating to intellectual property appearing on the corresponding elements.
Any reproduction, representation, exploitation and use, whether free of charge or in return for payment, whether direct or indirect, by the User, other than those referred to above, are prohibited, except with the express and prior authorization of the ICM, and in particular :
– Any adaptation, making available to the public at its request or not, distribution, rebroadcasting in any form whatsoever, networking, public communication, whether free or against payment, of all or part of the works, services, and all elements protected or likely to be protected by intellectual property law reproduced within the Site, and in particular the Content, Services, and Tutorials;
– Any link, access, modification, addition, deletion which relates to the automated processing system of the online edition and which modifies the conditions of publication or the editorial policy.
Any other form of use of the Tutorials, the Site, the Contents or the Services in fraud of the rights of the ICM would constitute an infringement punishable in particular by articles L.335-2 and following of the French Intellectual Property Code likely to expose the authors of these actions to civil and criminal legal proceedings.
In any event, the User shall refrain from developing, marketing and/or industrializing any Tutorial and/or any Device created on the basis of the use of the Site, its Services and Content and the Tutorials.
The ICM reserves the right to take all measures it deems appropriate to prevent or put an end to the infringement of its copyright or the copyright of third parties, without any liability being imputed to it because of such measures.
11. Hypertext links
11.1. From the Site
The ICM does not verify or select the content and sites that may be linked to the Site and is in no way responsible for the content of the sites to which links are made, including the sites of partners, which are published under their entire, exclusive and respective responsibility.
Their presence in no way means that the MHI adheres to or validates their content or accepts any responsibility whatsoever for the content or use of these third-party sites, including those of partners.
The links are proposed for information purposes only by the ICM without any selection, qualification or certification of the sites concerned.
Each User accesses third party sites under his or her sole and entire responsibility, including when links have been proposed from the Site.
11.2. To the Site
Any implementation of a link to the Site requires the express and prior authorization of the ICM, which may be requested at the following e-mail address: contact@icm-institute.org.
13. Protection of personal data
Personal data concerning the User, such as their connection data, are collected and processed in the context of access and use of the Site, its Services and its Content.
The ICM has the capacity of data controller within the meaning of Law No. 78-17 of 6 January 1978 as amended relating to data processing, data files and liberties and Regulation (EU) 2016/679 of the European Parliament and of the Council of 27 April 2016 on the protection of individuals with regard to the processing of personal data and on the free movement of such data (hereinafter the “Regulation”).
In this respect, the ICM has registered the processing operations it carries out on the register of its processing activities.
In accordance with the Regulation and in particular with article 6, 1. a) and article 9, 2. a) of EU Regulation 2016/679 of the European Parliament and of the Council of 27 April 2016 on the protection of individuals with regard to the processing of personal data and on the free movement of such data, the processing of personal data collected is based on the consent of Users and in particular on the acceptance of these GCU.
The information concerning Users is intended exclusively for their personal use, as well as for the ICM and ICM staff members and technical service providers, specifically authorised, in strict compliance with their missions, the ICM having ensured that the service providers present all the technical and organisational guarantees required to ensure data security.
Users’ personal data shall be stored and kept for the duration of the User’s use of the Site. Beyond that, the data is archived for XXXXX and at the end of the archiving, only non-identifying statistical data is kept.
In accordance with the Regulations, the User benefits from the following rights:
– the right to access and request correction of personal data;
– the right to delete personal data;
– the right to communicate his instructions concerning the fate of his personal data after his death;
– the right to request a limitation of the processing;
– the right to oblivion and digital erasure;
– the right to portability of one’s data;
– the right of opposition;
– the right to lodge a complaint with the CNIL;
– the right to withdraw their consent at any time, without prejudice to the lawfulness of the processing based on the consent given prior to withdrawal.
To exercise his or her rights, the User may contact the ICM department specifically authorised to respond to Users’ requests to exercise their rights, by sending an e-mail to the following address: contact@icm-institute.org.
The contact details of the Data Protection Officer appointed by ICM are : [to be filled in]. The User may contact him for any questions concerning his personal data.
ICM and its technical service providers shall implement all security measures in order to guarantee the protection and security of Users’ data, in particular with regard to unauthorized access by a third party.
14. Cookies
The Site is designed to be particularly attentive to the needs of Users. In this respect, cookies are used.
A cookie is a small alphanumeric file that is deposited in the User’s computer terminal when accessing the Site.
The cookies used within the framework of the Site have the exclusive purpose :
– improve navigation within the Site in order to use its various functions;
– to establish statistics of use of the various elements composing the Site (headings and contents visited, …);
– […]
As such, an information banner is displayed when the User connects to the Site, in order to inform him/her prior to the deposit of these cookies:
– the precise purposes of the cookies used;
– its right of access to the data collected;
– the possibility of opposing the deposit of cookies for the analysis of its navigation, and the fact that the continuation of navigation is equivalent to consent to the deposit of cookies on his terminal;
– the methods enabling him to change the parameters (internal settings, opposition to tracking, or browser settings), with respect to the deposit of cookies whose purpose is to access information already stored on his terminal, if applicable.
Via the banner, the User is invited to express his consent to the deposit of cookies whose purpose is to access information already stored in his terminal, where applicable.
On the Site, the MHI uses session cookies. These are temporary cookies that are kept in the computer’s memory and deleted when the User closes his browser or when he does not use the Internet for a certain period of time (generally about twenty minutes).
The deposit of cookies carried out in the context of the use of the Site does not make it possible to identify the User personally, but it records information relating to the navigation of his/her terminal within the Site that the MHI will be able to read during the User’s subsequent visits to the Site.
The information collected is for the exclusive use of the MHI or its technical service providers, and shall under no circumstances be transferred to third parties.
To prevent the downloading of cookies or to control the way they are used on your computer, please refer to the help section accompanying your Internet browser or go to: http://www.cnil.fr/vos-droits/vos-traces/les-cookies/.
15. Modifications to the GCU and changes to the Site
The ICM reserves the right to modify these GCU or the rules concerning the use of the Site, its Services and Content at any time. Each new version of these GCU shall be posted on line within the Site. Each User is required to regularly consult these GCU. The fact of continuing to use the Site after any modification of the GCU implies acceptance of the modifications of the GCU.
The ICM also reserves the right to develop the Site, the Tutorials (in particular to withdraw or modify them), the Services and the Content. Technical modifications may be made without prior notice from the ICM. Moreover, the ICM reserves the right to suspend access to the Site, temporarily or permanently, without delay, or compensation of any kind whatsoever.
16. French law
The Site has been designed for French Users. The present GCU are governed by French law.
In the absence of amicable settlement, any dispute relating to the Site or in connection with its use will be submitted to the French courts.
17. Cession
ICM may assign these GCU at any time to a subsidiary or successor, regardless of the transaction.
The User is not authorized to assign his agreement with the ICM.